Before designing anything, however, it’s important to brainstorm some ideas. Jot down notes and even some sketches of what you have in mind, so you have something to base your work on. It will serve as a point of reference that you can peek at during the logo design process and make sure your work aligns with your vision.
Getting Started
For this post, I’ll be using the basic Photoshop software with no addons or packages.
My goal is to create a design for my business, Snowflake Gems, which sells gems and jewelry. I’ll take you through each step of the logo design process, which you can replicate to create the logo design that you’ve sketched out for your brand.
Ready to start designing?
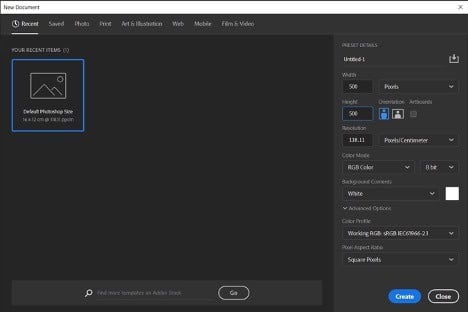
1. Create a new canvas.
The very first step on your logo design journey is to create a blank canvas. We recommend that you change the measurement to Pixels, and use a canvas size of at least 500px by 500px. Pixels (px) is a measurement that is universally known in the design world.
You can use a large or smaller canvas size if you want, but this is a decent size to start working with. If you want to change your canvas size, you can do so at any time by going to the canvas properties and manually changing the Height and Width.
2. Create a save file.
Always, always, always (we said it 3 times, so it must be important) create a save file. You never know when the unthinkable will happen, such as spilling a cup of coffee all over your laptop (been there!), and you want to make sure your work is saved.
One of the great things about Photoshop is you can save directly to Adobe cloud. This means that even if your laptop goes up in flames and disintegrates into a thousand tiny pieces, you can still access your logo design from another computer.
Click on File, then Save As, and choose to save in the Adobe cloud. If you’re feeling brave, you can save your logo design on your computer’s hard drive.
3. Draw a basic shape.
To draw a basic shape, choose the Pen tool from the Toolbar. You can also press the shortcut P. Make sure it’s set to Shape in the options bar, and not Path.
Note: We also recommend you turn on the grid, as it makes the drawing process much more manageable. Look to the upper-right hand corner, and you’ll see a magnifying glass that lets you search instead of hunting through all the different options.
Type in Grid, and when it shows up in the search bar, you’ll see the shortcut available, and simply click on it to turn it on.
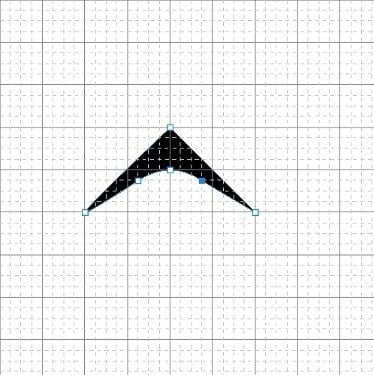
Now that the grid is on, let’s draw an arrow shape with the pen. Start by clicking on the top point of the canvas, then click on 3 more points to create the design. You can create whatever shape you want here, but to help you get comfortable with Photoshop, you can follow along with our design.
4. Improve the design by duplicating it.
At the moment, our logo doesn’t look like much, but this is just the beginning. Using our basic arrow, we’re going to duplicate it to create an intricate snowflake design with a cool color gradient.
Design suites like Photoshop use layers to make your job easier. It allows you to place different elements on top of each other to create beautiful effects. The arrow we produced is one layer, and we can freely edit and manipulate it.
So, let’s duplicate it.
Head over to the right-hand side, and inside of the Layers panel, right-click on the arrowhead layer and select duplicate.
Congrats! You’ve just duplicated your first layer. Now, we need to move it so we can see it. Press A, which is the shortcut for the Direct Selection Tool and click on the top of the arrowhead. We want to move it down slightly.
If you make a mistake or want to undo something, press CTRL + Z.
5. Add a color gradient.
Color plays an important role in logo design. To make our logo pop, we’re going to use a color gradient.
Now, gradient logos are somewhat controversial, in that they remind some designers of the cringey WordArt phase of design. However, if it works for Instagram and Airbnb, it can work for us!
To create a new gradient in Photoshop, click on Fill in the top menu, select New Gradient, and choose from any of the premade ones or create your own.
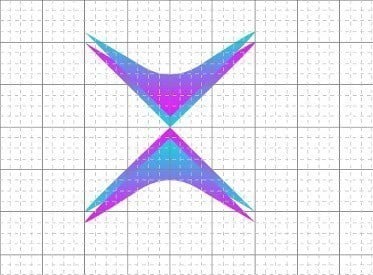
Now, to get the effect we want, choose a gradient, and for the second layer, reverse it with the reversal button in the bottom-right corner of the fill window.
6. Create a group, and duplicate multiple layers.
Our logo is starting to take shape, but we’ve still got some work to do.
Let’s group our 2 layers together by selecting them both, and pressing the group button, or CTRL + G. Grouping makes it easier to handle multiple layers at once.
Duplicate the new group, and with the Free Transformation tool, CTRL + T, we’re going to turn it 180 degrees.
Holding down the shift key will cause the rotate symbol to appear; now drag the group to turn it. Once it’s turned upside down, we’re going to let go. Do this 2 more times, until you have 4 elements pointing towards each other.
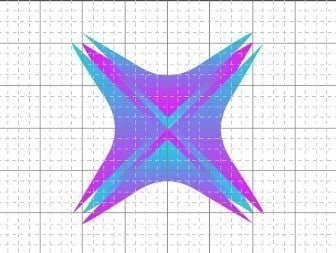
7. Create space, and duplicate again.
You can create space in the middle of your shape by moving each shape slightly away from the center. Then, create a new group that consists of all 4 layers and duplicate it. Turn the duplicate shape 45 degrees, and we’ve got a snowflake! You can duplicate your groups as many times as you like.
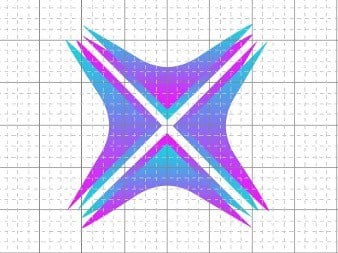
8. Add a circle with the shape tool.
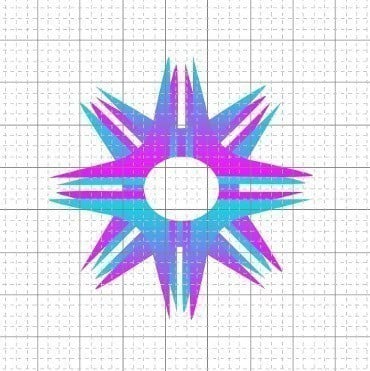
Using the Shape Tools, we’re going to add a circle.
Head over to the Shape Tools icon, right-click, and select the circle. Navigate to the center of your logo design, and hold down ALT to start drawing a circle.
Then, you can change the color of the circle to white if you want to create a nice big space in the middle of your logo.
9. Add a rectangle and center it.
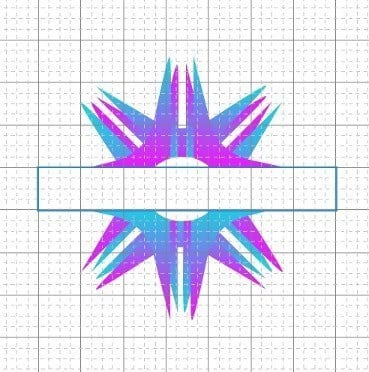
Using the Shape Tool again, choose a rectangle this time and create a white box.
This is where our logo text is going to go. To align it in the center automatically, use the Align tools from the menu bar or the Align Buttons in the options bar.
9. Add text.
To add text to your logo, click on the T icon, which is the Text Box tool in the toolbar, or press T.
Then, drag a text box across the screen to create it. Type your desired text (i.e. your brand name).

10. Choose your font and colors.
It’s essential to choose a typeface that represents your brand. Serif, sans-serif, or curved fonts can drastically change your logo’s look and feel, so experiment freely until you find the perfect font.
Make sure that you legally own your font, and that you can use it for commercial use in order to avoid trouble down the line.

11. Make adjustments.
You have plenty of room to make any edits or adjustments as needed, such as changing the color, shape, or even duplicating again and adding more elements. When you’re happy with your final design, save it in the format you require, and feel free to come back and edit it at any time.
Over to You
You’ve just learned how to create your own logo in Photoshop! It’s a great tool you can use, but it will take time and effort to learn the ins and outs.
If you want a fantastic logo design without any of the hard work, using our logo generator. You can use it to create a logo in under 5 minutes, and you don’t need any design experience to end up with a beautiful result.
