Whether you’re using email to promote new products, thank customers for signing up, or share your latest newsletter, you can make your business emails more professional by adding a logo to your signature.
Including your logo puts your brand’s stamp on your communications with customers, asserting your business’s image and voice and building brand recognition as a result.
Remember: Emails aren’t just between customers and service reps; they’re between customers—or potential partners—and your brand. Get customers acquainted with your logo and strengthen their connection with your business by branding your emails.
Why You Need a Logo in Your Email Signature
First off, it should take you 5 minutes tops to stick your logo on your email signature, which is barely a blip on your day. However, if that isn’t enough of a reason to just do it, here are a few important ones to consider:
1. Brand Recognition
Your logo is the face of your business or brand, which means it’s a face you want seen as often as possible by the people interacting with you. People tend to process images more quickly than they do text, and over time, they’ll be able to instantly recognize you by your logo. A quick look at your email is all it takes for the receiver to remember who you are – and they’ll be less likely to forget in the future.
2. Personal Connection
It’s often easy for customers to forget that there’s a person on the other side of the screen who is actively writing them emails.
However, when your name and job title is paired with your company logo, it automatically creates an association between you, the human, and you, the company, for your audience. Adding your logo to your signature lets you personally form a relationship with your audience while humanizing your company in the process.
3. Brand Identity
Although a well-thought-out design, your logo is ultimately just a vessel for the meaning you infuse it with. So, with every email you send that is paired with your logo, the contents of that email—the voice, the imagery, the message—will automatically be tied to your logo, helping to establish the personality of your brand.
This repeated exposure is what will help you to form your brand identity over time, as your audience becomes more familiar with your logo and the traits they come to associate it with.
Best Practices for Using a Logo in Your Emails
Now that you’ve updated your email signature, keep in mind these tips to maximize the effectiveness of your logo:
Scale for mobile
This year, mobile accounted for nearly 50% of all email opens. That means it’s especially important that your emails are readable on mobile. When you create your logo design, make sure it looks great on mobile devices, and that your email template is appropriately sized for the mobile screen.
Insert alt text tags
Alt text tags are snippets of text that describe an image, or in this case, your logo. They come in handy when an image file cannot be loaded.
If your logo doesn’t load when a user opens her email, she’ll see the alt text in place of the image. This is a graceful way to keep your emails visually pleasing, even when your logo doesn’t show.
Use a transparent logo background

Your logo will appear more professional in the signature of your email if you use a transparent logo background. This way, your logo will look great regardless of the email template you choose.
Consider sizing and placement

After adding your logo to your email signature, always send yourself a test email to be sure the logo is well-placed. Check that your logo is large enough to see, but not so large it overpowers the rest of your email.
Play around with the placement and sizing to make sure your logo aligns visually with the rest of your email signature and fits well within your email template.
7 Easy Steps to Putting Your Logo in Your Gmail Signature
We’re going to start with Gmail, as it’s the most popular email provider. (Scroll down for a tutorial on adding your logo to an Outlook email signature.)
And, if you want to add your logo to an email with another provider like Yahoo, don’t worry—most of the processes are pretty similar. Just make sure to read up on your specific provider to make sure you have the right logo file type and size for the job.
Step 1. Click the Gear icon in the upper right corner of your Gmail account, and then click Settings.
Step 2: In the General tab, scroll down to the Signature section. In the space provided, enter the text you’d like to include in your signature. Think of your signature as a business card, with your full name, job title, and contact information, such as your phone number or link to your company website.
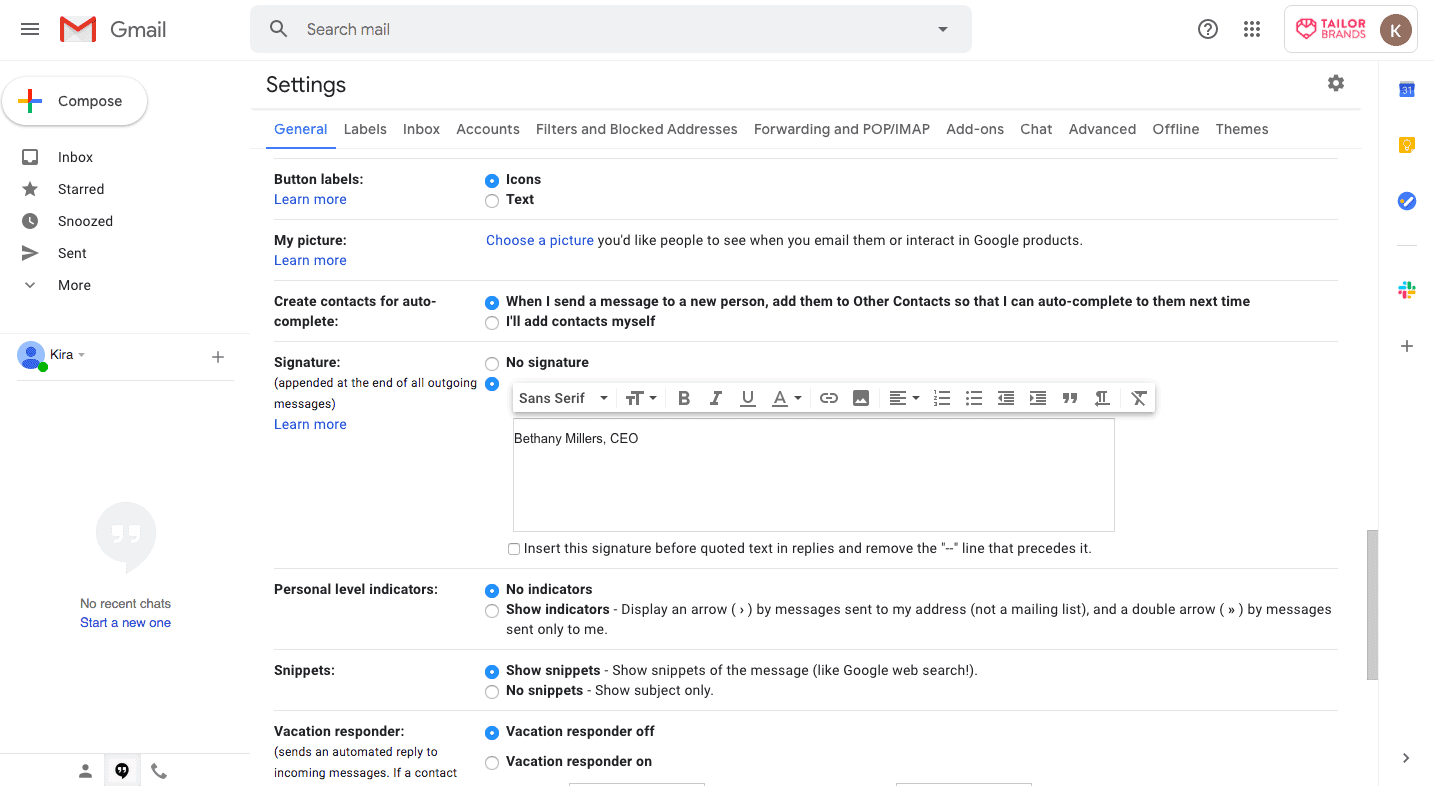
Step 3: In the toolbar above the textbox, click the picture icon (which appears as a square with a silhouette of a mountain) to add an image.
Step 4: Click Upload to upload an image saved to your computer. If you’d prefer to upload a photo from the web, click Web Address (URL) and copy and paste the link to your image. (It’s important to note that Gmail can be buggy, and that it might display a box or question mark in the text box rather than the image you uploaded—that’s okay.)
Step 5: Scroll down and click Save Changes.
Step 6: Test your signature by emailing yourself. Make sure the logo shows up in the email, and that it’s the correct size.
Step 7: If you need to edit your signature’s logo or text, go back to Settings and scroll back down to the Signature Here, you can click on the image to make it larger or smaller. You can also play around with fonts and colors, and experiment with adding a tagline or links to your social media pages.
How to Add a Logo Signature to Outlook
If you use Microsoft Outlook as your email provider, adding your logo to your signature only takes a few minutes. Here’s how you can do it in 5 steps:
Step 1. Open Microsoft Outlook, and go to the Tools drop-down menu. Then, select Options.
Step 2: From there, click on Signatures, to open the Signature and Stationary Dialog Box. (Alternatively, you can go to the Insert tab, click Include, and then click on the Signatures option.)
Step 3: In the Select Signature to Edit box, choose the signature that you want to add your logo to.
Step 4: Now, you should see a section for Edit Signature; there, putyour cursor on the place where you want to insert your logo. Then, in the Insert Picture dialog box, select the logo and click on the Image icon. Your logo should then automatically be inserted into the signature, and you should be able to see it right in the dialogue box.
Step 5: Click on OK in the Signature and Stationery dialog box to finish, and you’re all set!
Over to You
Ready to put your logo in front of your customers?
Remember, adding a logo to your email signature is an important way to brand your emails, helping to establish your brand’s authority and drive brand recognition among your audience. Always double check that your emails are sending with your signature, so that you can ultimately build up this recognition.
